
AWC Electronics - GP3 w/Excel
Click image for larger view
Excel is an excellent tool for manipulating and analyzing data. However, what if you want to actually acquire data into Excel? That isn't as easy -- until now. The GP3 kit from AWC allows you to monitor (or control) 8 digital lines and read 5 analog inputs (with 10-bit resolution). In addition, the GP3 provides a hardware timer/counter, one hardware PWM output, and an onboard LED indicator.
What's this have to do with Excel? We provide a wide array of program libraries that make it simple to use the GP3 from many popular programming languages. The ActiveX DLL is perfect for use with Excel. The ActiveX DLL is available in the Core library install package. The Excel example files are also available.
The key, of course, is to use macros to communicate with the ActiveX DLL.
It is very simple to connect to the GP3 using an Excel macro:
Set ws = ActiveSheet
Set io = CreateObject("AWCGP3DLL.GP3DLL")
io.commport = ws.Range("ComPort").Value
io.portopen = True
Notice I don't hardcode the commport parameter (although you could). Instead, I get a reference to the active worksheet and then find a named range (in this case, a single cell range) named ComPort. This allows the spreadsheet to supply the parameter and doesn't require the spreadsheet to use a particular cell for the parameter. Use the Insert | Name | Define menu command to manipulate range names. The library makes extensive use of named cells to allow the spreadsheet to set parameters.
Once you have an open connection to the GP3, the rest is easy. For example, here is a function that returns the raw counts from the first analog input channel:
' This is the function you use to get the value from the GP3
Function DAQ()
DAQ = io.a2d(0)
End Function
The example spreadsheet uses a few uncommon techniques. First, once you start the process, the macro automatically runs at a particular interval. Here's the function responsible for setting things up:
' Sets up the next timer event
Sub NextTimer()
RunWhen = Now + TimeSerial(0, 0, delay)
Application.OnTime earliesttime:=RunWhen, procedure:="DoDAQ", schedule:=True
End Sub
The RunWhen variable gets the current time (Now) increased by the delay (in seconds). The delay variable was loaded earlier from a named range (just like commport). The Application.OnTime call tells Excel to schedule the DoDAQ routine to run no sooner than the RunWhen variable allows. Once it executes the call, the schedule is complete, so to continue you must call NextTimer again as part of DoDAQ.
The buttons on the spreadsheet are placed using the Control Toolbox (use the View | Toolbars menu to see this toolbox). The button properties are set so that they don't steal the focus (this is just a user interface concession). The event for each button calls the macros to fire off the DAQ functions:
Private Sub DAQGo_Click()
StartDAQxy ActiveSheet.Range("StartCol"), ActiveSheet.Range("StartRow")
End Sub

Private Sub Stopit_Click()
StopDAQ
End Sub
Again, named cells provide the arguments to StartDAQxy.
The library has several calls:
|
DAQ - This function returns the value to log. It is a function so it is easy to change this to something else or add math calculations to the results. |
|
|
NextTimer - Sets up the macros to run at the next timer interval. |
|
|
StartDAQ - Starts timed DAQ at the current cell. |
|
|
StartDAQxy - Starts timed DAQ at a particular x,y location |
|
|
DoDAQ - Actually calls DAQ, stores the results, moves to next location, and schedules itself to run again. If you want to do extensive customization (i.e., log 4 A/D readings instead of 1) this is the subroutine you'll want to change. |
|
|
StopDAQ - Stops the timed cycle. |
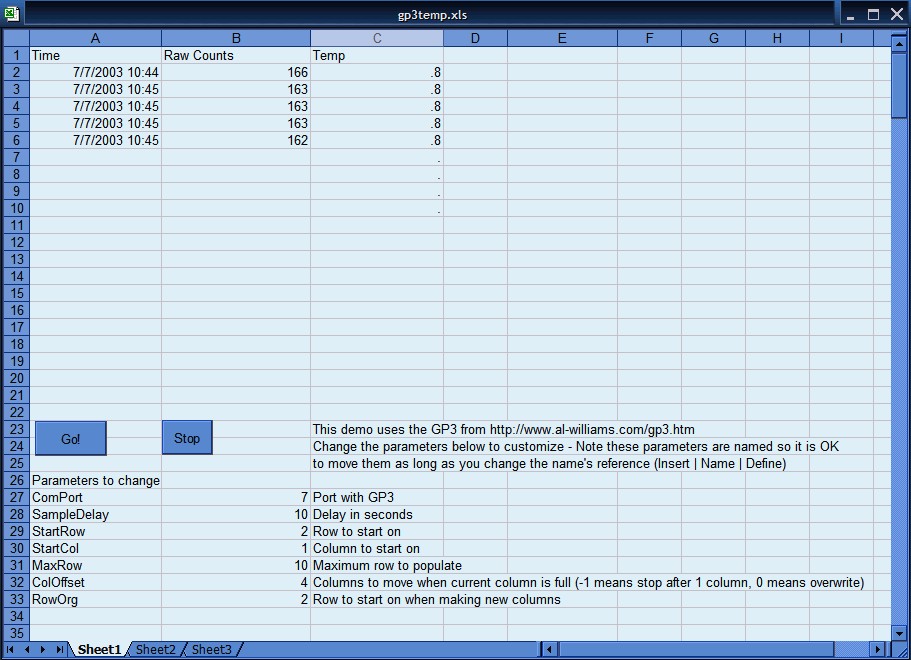
There are several named cells the library looks for:
|
ComPort - The COM port number the GP3 is using (example, 1) |
|
|
SampleDelay - Number of seconds between readings |
|
|
StartRow - The row to start (starts at 1, not 0) |
|
|
StartCol - The column to use for logging (starts at 1); two columns are used for each sample (one for date/time) |
|
|
MaxRow - The highest number row to receive data |
|
|
ColOffset - When logging reaches MaxRow, the macros add ColOffset to the StartCol variable to find the next column that should receive data -- set to 0 if you want to overwrite the old data or -1 if you want the macro to stop when full |
|
|
RowOrg - When the macros move to a new column (using ColOffset) it starts the new column at this row number Site contents © 1997-2018 by AWC, Houston TX (281) 334-4341 |