
AWC Electronics - Using the APP-II as a Programmer
The APP-II is a great way to program PICs with very little effort. You simply download your software directly to the chip via an RS-232 cable. However, what do you do when you want to make your PIC program part of a permanent project? One answer, of course, is to buy another APP-II chip. The chip isn't much more expensive than a bare PIC and you can simply wire the "jumper" shut on your project board.
However, you can also use your APP-II as a low voltage programmer for any PIC16F87xA-series parts (notice you have to use the latest "A" version -- the older chips will not work). All you need is a solderless breadboard and the right kind of PIC plus some free software you can download from this page. Of course, you also need a hex file that you want to program into the new PIC.
Here's the software you need:
And here are the steps you'll take:
1. Download the app2pgm.hex file to your APP-II just as you would load any hex file to the APP-II. You can do this with Hyperterminal or any of our loaders. The idea is that you are going to turn your APP-II board into a PIC programmer with this file. By the way, this file is specific to the APP-II, so it won't work on an ordinary processor. You only have to do this step once (until you write another program into your APP-II anyway).
2. Once you've downloaded the firmware, disconnect the power from the APP-II and make the following connections from your APP-II to the PIC chip you want to program:
| APP-II pin | JP1 pin (GPMPU board) | Target Pin | 16F873/6A Pin | 16F874/7A Pin |
| Ground (8 or 19) | 1 | Vss | 8 and 19 | 12 and 31 |
| RC1 (12) | 3 | RB6 | 27 | 39 |
| RC0 (11) | 4 | RB3 | 24 | 36 |
| RA5 (7) | 5 | MCLR | 1 | 1 |
| RA3 (5) | 7 | RB7 | 28 | 40 |
| 5V (20) | 11 | Vdd | 20 | 11 and 32 |
3. Restore power to your setup. Be sure the APP-II programming jumper is in place.
4. Run the APP-II Copier program (this requires Microsoft Windows):
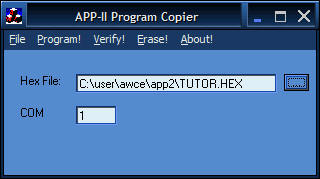
Select the HEX file you want to program into the target and pick the correct COM port. Press Program! (which also verifies the download).
5. The Copier will show you the fuse word that is in your hex file (if any). You'll have a chance to change it, if necessary. Remember, the new chip isn't an APP-II, so you do have to set appropriate fuses (that is, oscillator options, watch dog timer options, etc.) to get the chip to work. Once you confirm the fuse word, it takes a minute or so and you have a programmed device. Remove the power and the target IC and you are ready to use it.
There are a few limitations:
1. You must use the "A" suffix parts (these are newer and cheaper than the old parts anyway).
2. The part must have its LVP fuse set to 1 (this is the default). If the LVP fuse is not set to 1, the APP-II copier can't program it and you'll have to erase the PIC in a "normal" programmer that can supply a high voltage to the MCLR line.
3. The programmer can't clear the LVP fuse in the configuration word (which makes sense if you think about it).
4. The APP-II's built in routines are not present on the new chip, so if you are using them in your program you'll have to provide suitable alternatives before programming the new chip.
5. The new chip can't use RB3 (this is a limitation of LVP mode on all PICs). Your completed system must hold RB3 low.
Keep in mind that the copier can program a PIC16F873A (the same as the APP-II chip) and it can also program 16F874A, 16F876A, and 16F877A. This is a great way to expand your PIC programming repertoire.
Site contents © 1997-2018 by AWC, Houston TX (281) 334-4341